Adding Channels
In this section, you will configure the nodegraph for each engine and create the required channel structure. Virtual Studio configurations may vary (for example, custom cyclorama, custom projection mesh, or virtual fly-over with talent tracking). In this example, a standard Green Screen Virtual Studio setup is used.
Virtual Studio Show Channels
- Open the Noodegraph/Action module and click on Engine 01 in the Engine Status Toolbar to ensure you are working in Engine 01’s nodegraph.
- Click the Copy Graph button in the LiveGraph above and paste it into Engine 01’s nodegraph using the
⌃ CTRL+Vkeyboard shortcut. The nodegraph should match the LiveGraph exactly. - Select the UE5 node, navigate to the Node Details Panel, open the UE5 folder, navigate to the Properties section, expand Lino Channels, and change the default PGM_AR name to PGM_VirtualStudio.
- Repeat the same steps for Engine 02 and Engine 03.
Engine 01, Engine 02, and Engine 03 use Nodos channels that are enabled in the Launcher. Therefore, no additional channel configuration is required. Their default channel type is Viewport Channel, and the channel name is PGM_AR for all three engines. This is important because Reality Lino Manager identifies and groups channels based on their names and prefixes. For more information, refer to Reality Lino Manager.
- Click on Engine 04 in the Engine Status Toolbar.
- Drag and drop the UE5 processing node onto the nodegraph canvas and select it.
- In the Node Details Panel, open the UE5 folder, navigate to the Properties section, expand Lino Channels, and click Create Dynamic Channel (plus icon).
- Expand the
RealityLinoManager.DynamicChannelsproperty group. - Enable the
isPreviewChannelcheckbox.
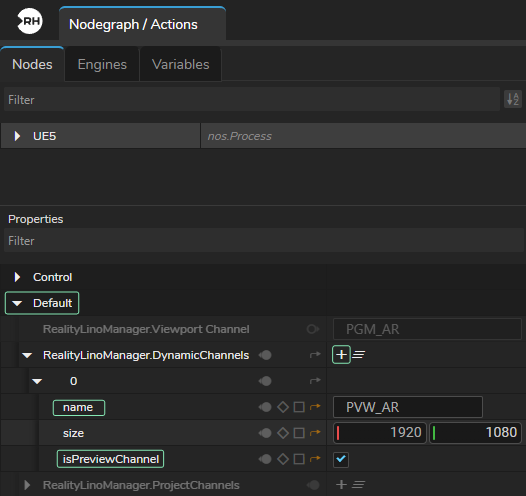
- Since Engine 01, Engine 02, and Engine 03 share the channel name PGM_AR, Engine 04 must use the same suffix for preview identification. Rename the channel from PVW_Channel1 to PVW_AR.
The channel setup for the Virtual Studio show is now complete.
Video Wall Show Channels
As outlined in the Project Overview section, the engines in the Video Wall show require dynamic channels.
- Click on Engine 05 in the Engine Status Toolbar.
- Drag and drop the UE5 processing node onto the nodegraph canvas and select it.
- In the Node Details Panel, open UE5 > Properties, expand Lino Channels, and click Create Dynamic Channel (plus icon).
- Expand Reality
LinoManager.DynamicChannels. - Rename the default channel from
PGM_Channel1toPGM_VideoWall. - Click on Engine 06 in the Engine Status Toolbar to switch to Engine 06’s nodegraph.
- Repeat the same steps as Engine 05.
- Enable the
isPreviewChannelcheckbox. - Rename the dynamic channel to
PVW_VideoWall.
Overlays Show Channels
The engines in the Overlays show also require Dynamic Channels.
- Switch to Engine 07’s nodegraph, create a Dynamic Channel, and rename it to
PGM_Overlays. - Switch to Engine 08’s nodegraph, create a Dynamic Channel, enable the
isPreviewChannelcheckbox, and rename it toPVW_Overlays.
The channel setup is now complete. Switch to the Launcher module and verify the channel indicators.
Channel Indicators in Launcher Module
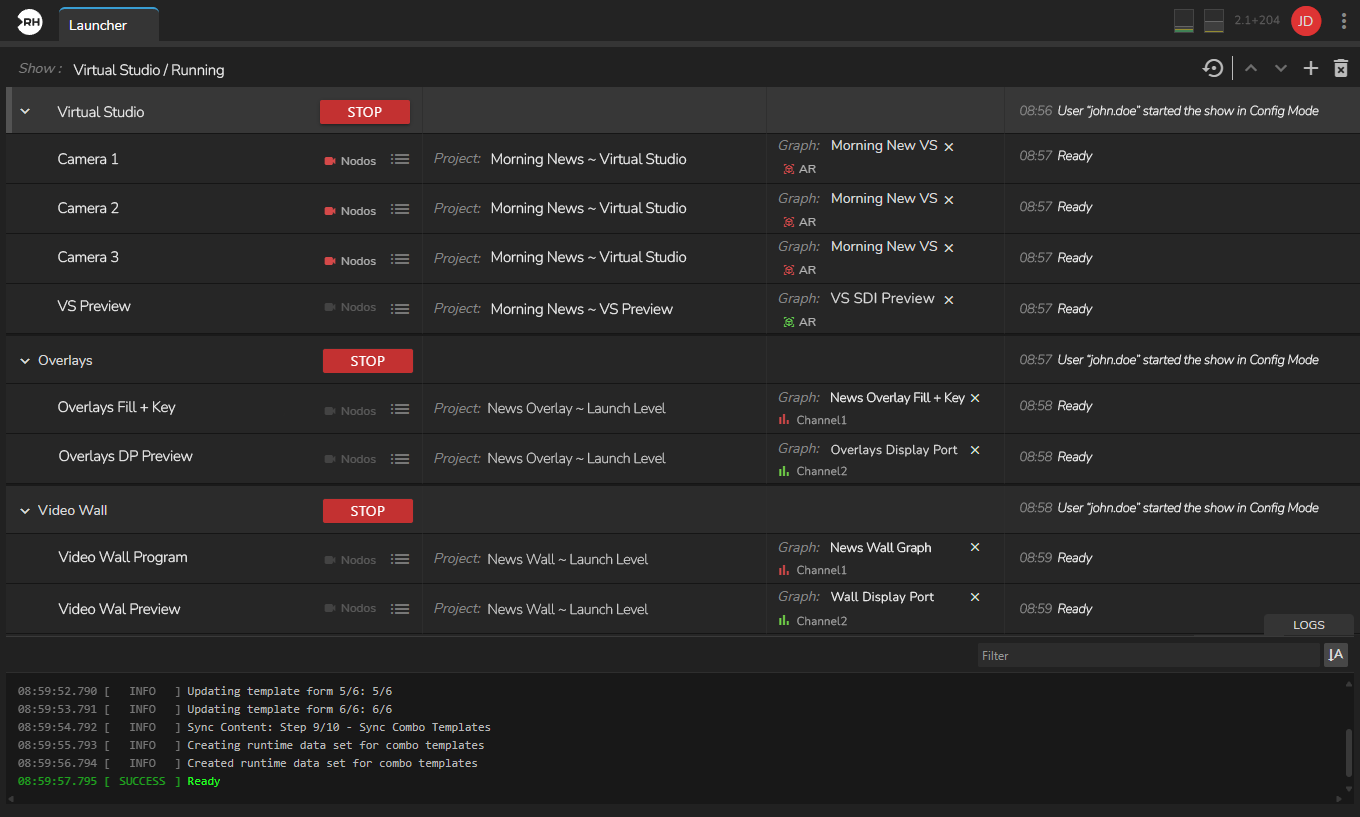
In the Launcher, each channel is identified by an icon. Red indicates Program channels, and green indicates Preview channels. The following icons become visible in the Launcher module after channel configuration is completed:
- Dynamic Channel (Program)
- Dynamic Channel (Preview)
- Project Channel (Program)
- Project Channel (Preview)
- Viewport Channel (Program)
- Viewport Channel (Preview)
- Nodos Channel (Program)
Nodos channels, by design, can be previewed throuth Dynamic channels.
Our channels are created. In the next step we will continue with Templates in Lino playout module.